Making your own edibles boils down to two core steps. First, you gently heat your cannabis to “activate” its compounds. Second, you infuse that activated flower into a fat, like butter or oil. That’s the entire secret. This simple process unlocks the plant’s potential, turning any recipe into a reliable, custom-dosed treat. Once you master these fundamentals, you can stop guessing and start getting consistent, amazing results every single time.
Why Bother Making Your Own Edibles?
When you make edibles in your own kitchen, you get one thing a dispensary can’t sell you: total and complete control. Forget wondering what’s really in that store-bought gummy or how strong it actually is. Making them yourself puts you in the driver’s seat. This isn’t just about saving money; it’s about crafting an experience that’s perfectly tailored to you.
This DIY approach lets you call all the shots.
- You control the potency. You decide exactly how much cannabis goes in, so you know precisely how strong your final product will be. This makes dosing predictable and safe. For example, you can create a 5mg cookie for a mellow evening or a 25mg brownie for a more profound experience.
- You choose the ingredients. Want to use grass-fed organic butter, go gluten-free, or stick to vegan oils? No problem. You hand-pick every ingredient, which is a game-changer for anyone with dietary restrictions or a taste for the good stuff.
- You dictate the flavor. You aren’t stuck with just brownies. Infuse high-quality olive oil for a savory pasta sauce or coconut oil for a batch of tropical-inspired cookies. The culinary possibilities are endless.
Understanding the Basics
The science behind making edibles is surprisingly simple. You can’t just toss raw cannabis into cookie dough because its main compound, THCA, is non-psychoactive. It needs heat to convert into THC, the compound that produces the desired effects. This crucial heating step is called decarboxylation.
Once the THC is activated, it needs a vehicle to enter your system. Cannabinoids are fat-soluble, meaning they must bind to fat molecules to be absorbed by your body. This is why infusing the cannabis into butter or oil is the critical next step.
Mastering these two steps—decarboxylation and infusion—is what separates a great batch of edibles from a waste of good flower. It’s how you transform inactive plant material into a potent and predictable culinary ingredient.
The rise of homemade edibles mirrors the explosive growth in the commercial market. The sheer variety of products available is a testament to the versatility you can achieve in your own kitchen.
This chart just scratches the surface of what’s possible. The global cannabis edibles market was valued at around $12.3 billion in 2024 and is projected to hit $54 billion by 2034. This trend shows just how mainstream and sophisticated the world of edibles has become. You can read more about the growth of the cannabis edibles market to see where things are headed.
Unlocking Potency with Perfect Decarboxylation
If you take only one lesson from this guide, let it be this: you absolutely must decarboxylate your cannabis. This is the non-negotiable step that separates potent, effective edibles from a batch of expensive, disappointing snacks. I’ve seen countless beginners skip it and wonder why their brownies did nothing.
So, what is it? Decarboxylation (or “decarbing”) is simply the process of using gentle heat to chemically “activate” the cannabis. Raw flower is full of a non-psychoactive compound called THCA. Applying heat removes a carboxyl group from the molecule, converting THCA into the THC that provides the desired effects. Without this crucial first step, you are wasting your money and time.
Mastering this simple process puts you in complete control. It ensures every bit of your flower is primed and ready before you even think about infusing it into butter or oil.
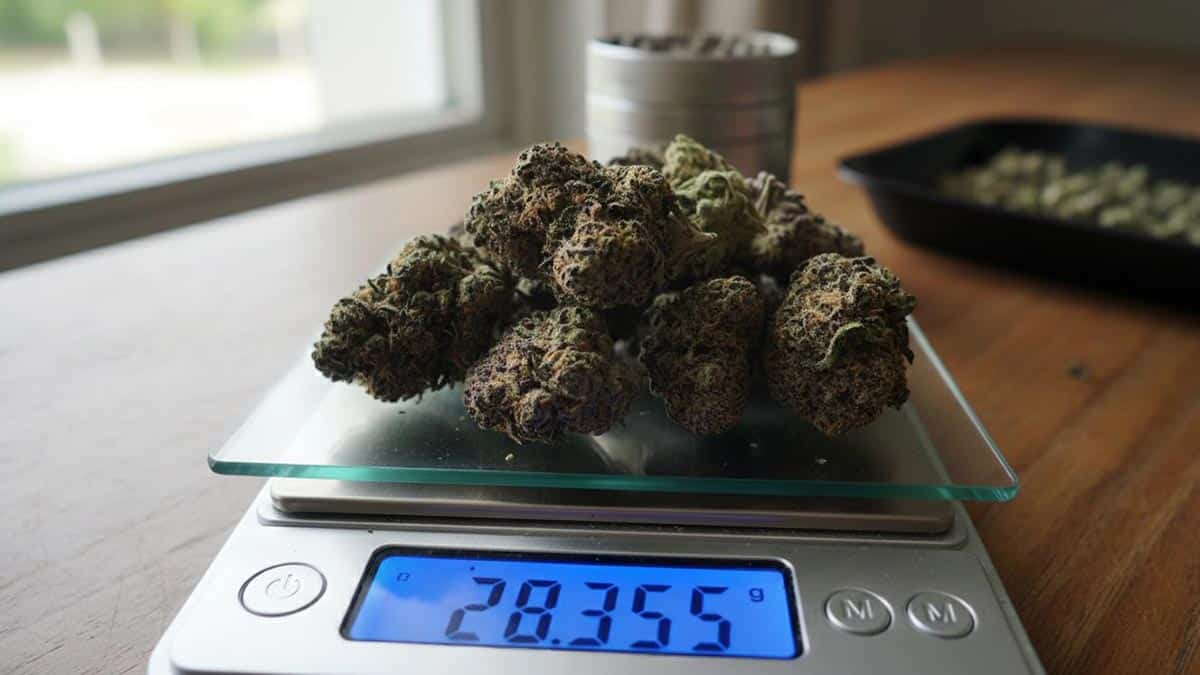
The image below gives you a great visual on the starting ratio of cannabis to butter, a key measurement to nail down before you even start the decarb process.
Getting this right from the start sets the stage for a perfectly potent infusion—not too weak, but not overwhelmingly strong either.
The Reliable Oven Method
For most people, the kitchen oven is the easiest and most accessible tool for the job. It provides the consistent, dry heat you need to activate your flower with minimal fuss. The key here is patience; don’t try to speed things up by cranking the temperature. Low and slow wins the race.
Here’s my go-to, foolproof approach:
- Set Your Oven: Preheat it to 240°F (115°C). I strongly recommend using a standalone oven thermometer. The built-in ones can be off by 15 degrees or more, a difference that can ruin your decarb by either failing to activate or burning off the cannabinoids.
- Prep the Flower: Gently break your buds into smaller, popcorn-sized nugs with your hands. Grinding it into a fine powder is unnecessary and increases the risk of scorching it.
- Spread it Out: Lay the pieces in a single, even layer on a baking sheet lined with parchment paper. This prevents sticking and ensures everything heats evenly.
- Bake and Wait: Let it bake for 30-40 minutes. Give the sheet a gentle shake halfway through to toss the flower and expose all sides to the heat.
You’ll know it’s ready when the flower turns from a vibrant green to a lovely golden-brown, and your kitchen fills with a distinct, toasty aroma. Let it cool completely on the tray before moving on to the infusion step.
Comparing Decarboxylation Methods
Each decarbing method comes with its own trade-offs, from smell and convenience to precision. The oven is a fantastic starting point, but other techniques might be a better fit depending on your situation.
| Method | Temperature & Time | Pros | Cons |
|---|---|---|---|
| Standard Oven | 240°F (115°C) for 30-40 mins | Easy, requires no special equipment, very reliable. | Produces a strong, noticeable cannabis smell. |
| Mason Jar (Oven) | 240°F (115°C) for 60 mins | Significantly reduces odor, self-contained. | Takes longer, requires careful handling of a hot jar. |
| Sous Vide | 203°F (95°C) for 90 mins | Odor-free, extremely precise, preserves terpenes well. | Requires specialized sous vide equipment. |
Choosing the right one is a matter of balancing your needs for discretion, your desire for precision, and the equipment you have on hand.
The Mason Jar Method for Odor Control
Let’s be real: the classic oven method will make your entire home smell. If you need a more discreet option, the mason jar method is a game-changer. It traps almost all the aroma inside the jar while still delivering perfectly activated cannabis.
The process is nearly the same. Place your broken-up flower into a clean, oven-safe mason jar and lightly screw on the lid—don’t crank it down, as you want a little pressure to be able to escape. Lay the jar on its side on a baking sheet and place it in the oven for 60 minutes at 240°F (115°C). Every 15 minutes, carefully use an oven mitt to give the jar a gentle shake to move the flower around.
Pro Tip: The most important part of this method is letting the jar cool down completely before you open it. This allows all the vaporized cannabinoids and terpenes to re-condense onto the flower, so you don’t lose any potency or flavor in a puff of steam.
The entire process of making edibles relies on two core principles: decarboxylation to activate THC, followed by infusion into a fat like butter or oil. This allows the cannabis compounds to bind effectively, which is key for bioavailability. You can find more details about the broader cannabis edibles market and its processes if you’re curious about the commercial side of things.
Sous Vide for Ultimate Precision
If you’re a perfectionist who wants total control over the outcome, sous vide is the ultimate decarbing technique. By using a precisely controlled water bath, you can hold the cannabis at an exact temperature, completely eliminating any chance of burning. This gentle process is also fantastic for preserving terpenes, the aromatic compounds that contribute to the flavor and nuanced effects of your edibles.
You’ll need a sous vide precision cooker for this. Simply vacuum-seal your flower in a food-safe bag and submerge it in a water bath set to 203°F (95°C) for 90 minutes. This lower, gentler temperature fully activates the THC while keeping the delicate terpenes intact. The result is a flawlessly decarbed product with a superior flavor profile—perfect for anyone aiming to make truly top-shelf edibles at home.
The Art of a Clean and Potent Infusion
With your cannabis activated and ready, it’s time for the fun part: infusion. This is where we transfer those valuable compounds from the plant into a fat your body can easily absorb. This critical step turns ordinary butter or oil into the powerhouse ingredient for any edible you can dream up.
The science behind it is straightforward. Cannabinoids like THC are lipophilic, a term meaning they are “fat-loving.” They readily dissolve in and bind to fat molecules, a chemical property you can read more about on Wikipedia’s page on lipophilicity. Without a fatty carrier, your body can’t absorb the THC effectively, rendering your edibles useless.
This stage defines the quality, flavor, and kick of your final product. The goal is to gently coax the cannabinoids out of the plant material and into your fat, all without overheating and degrading the good stuff.
Choosing Your Infusion Fat
The fat you choose directly impacts the taste and texture of your creations, so pick one that complements what you’re making. Each fat has its own unique properties and best use cases.
- Unsalted Butter: The undisputed classic. It’s the go-to for traditional baked goods like brownies, cookies, and cakes. Its rich, creamy flavor provides the perfect foundation for most sweet treats.
- Coconut Oil: A wonderfully versatile option. Refined coconut oil is virtually flavorless, making it a great all-purpose choice for any recipe. Unrefined (virgin) coconut oil offers a subtle tropical flavor that’s amazing in certain desserts or even savory dishes like a cannabis-infused Thai curry.
- Olive Oil: This is your key to savory cooking. Imagine a high-quality extra virgin olive oil infused with cannabis—it creates incredible salad dressings, marinades, or a perfect finishing drizzle over pasta or pizza.
Ultimately, match the fat to your recipe’s needs. If your famous cookie recipe calls for butter, use cannabutter. If you’re making vegan brownies that require oil, infused coconut oil is your answer. The infusion process itself remains the same.
The Stovetop Cannabutter Method
Making cannabutter on the stove is the old-school, tried-and-true method. It requires a bit of attention, but it gives you a hands-on feel for the process. The absolute key is to keep the heat low and gentle. You do not want to scorch the butter or burn off the precious THC.
A double boiler is your best friend here. If you don’t have one, you can easily make one by placing a heatproof bowl over a saucepan with an inch or two of simmering water. This provides a gentle, indirect heat that’s much safer than a direct flame.
Here’s the step-by-step:
- Combine and Melt: Add one cup of water and one pound of butter to your pot or double boiler. The water is a fantastic trick—it helps regulate the temperature and prevents the butter from burning.
- Add the Green: Once the butter is fully melted, stir in your decarbed flower. A common starting ratio is one ounce of flower per pound of butter, but you can always adjust this for potency.
- Low and Slow: Let this mixture simmer gently for 2 to 3 hours. You’re looking for just a few lazy bubbles, never a rolling boil. Stir it every 30 minutes to prevent sticking.
- Strain It: Let the mixture cool slightly so it’s easier to handle, then carefully pour it through a cheesecloth-lined strainer into a glass container. The cheesecloth will catch all the plant material.
- The Golden Rule: Don’t Squeeze! Resist the temptation to squeeze the cheesecloth to get every last drop. All you’ll do is force chlorophyll and other plant matter into your butter, giving it a harsh, grassy flavor. Just let gravity do the work.
- Chill and Separate: Place the container in the fridge. As it cools, the butter will solidify into a beautiful green disc on top of the water. You can then easily lift the butter off and discard the water.
Pro Tip: Patience is everything. Keeping the temperature consistently low protects the THC and terpenes, which are responsible for the potency and flavor. A gentle simmer is the secret to a clean and powerful infusion.
The Effortless Slow Cooker Method
If you’re looking for a “set it and forget it” approach, the slow cooker is your secret weapon. This method is perfect for beginners because it holds a super-stable, low temperature for hours. It’s almost impossible to scorch your infusion.
The process couldn’t be simpler. Just add your butter, a cup of water, and your decarbed cannabis to the slow cooker. Turn it on the lowest setting, put the lid on, and walk away. Let it infuse for 4 to 6 hours, giving it a stir once or twice if you think of it.
This long, slow infusion does an incredible job of extracting cannabinoids, often resulting in a highly potent end product. When the time is up, simply strain it through cheesecloth as you would with the stovetop method. This is the ultimate hands-off technique for anyone who wants great results without being chained to the stove.
Dosing Your Edibles for a Safe Experience
This is, without a doubt, the most critical part of making edibles at home. Commercial products come with lab-tested labels telling you exactly what’s inside, but when you’re the chef, you’re also the chemist. Nailing the dosage is the secret to a safe, enjoyable, and predictable experience, and it’s how you avoid the classic rookie mistake: baking a batch of brownies that sends you to another galaxy.
Don’t be intimidated by the math. We’re talking about simple calculations that give you a solid estimate of your edibles’ strength. Figuring out the approximate milligrams (mg) of THC per serving is how you create a consistent product every single time.

This step empowers you to know exactly what you’re consuming, which is what separates a good homemade edible from a recipe for disaster.
A Simple Formula for Estimating Potency
First, you need to know the THC percentage of your flower. Let’s say you’re working with a strain that’s labeled 20% total THC. If you’re unsure, assuming an average of 15-20% for decent-quality cannabis is a safe starting point.
The basic math looks like this:
- Convert your flower from grams to milligrams. Remember, 1 gram = 1,000 milligrams.
- Multiply that number by the THC percentage. This tells you the total potential THC you’re starting with.
Let’s walk through a real-world example. Say you’re starting with 7 grams of flower that has 20% THC.
- 7 grams is 7,000 milligrams of cannabis.
- 7,000 mg x 0.20 (for 20%) = 1,400 mg of potential THC.
But here’s a pro tip: the process isn’t 100% efficient. You’ll always lose some cannabinoids during decarbing and infusion. A smart, conservative estimate is to assume about an 80% efficiency rate.
1,400 mg (potential THC) x 0.80 (efficiency factor) = 1,120 mg of activated THC in your final oil or butter.
That final number, 1,120 mg, is the total estimated firepower in your entire batch of cannabutter. Now you can calculate the dose per serving for any recipe. If you need a refresher on cannabis weights, our guide on how much weed is a quarter can help.
Calculating Dose Per Serving
Okay, let’s take our cannabutter with its 1,120 mg of THC and use it. You decide to make a pan of brownies that yields 16 servings.
The math is straightforward:
- Total THC in Batch / Number of Servings = THC Per Serving
- 1,120 mg / 16 brownies = 70 mg of THC per brownie
Hold on—a 70 mg brownie is extremely potent, especially for a beginner. For context, a standard dose in most legal markets is just 10 mg. Knowing this, you can easily slice each of those 70 mg brownies into seven smaller, more manageable 10mg pieces.
To give you a clearer picture, I’ve put together a sample calculation table.
Sample Dosing Calculation for Brownies
| Variable | Example Value | Calculation Step |
|---|---|---|
| Cannabis Amount | 7 grams | This is your starting material. |
| THC Percentage | 20% | Find this on the label or estimate. |
| Total Milligrams | 7,000 mg | 7 grams x 1,000 mg/gram. |
| Potential THC | 1,400 mg | 7,000 mg x 0.20 (20% THC). |
| Efficiency Rate | 80% | A safe estimate for home infusion. |
| Activated THC | 1,120 mg | 1,400 mg x 0.80. This is your final potency. |
| Number of Servings | 16 brownies | How many pieces your recipe makes. |
| THC Per Serving | 70 mg | 1,120 mg / 16 servings. |
This table shows just how quickly the potency can add up. Plug in your own numbers to stay in control of the final result.
The Golden Rule: Start Low and Go Slow
If you remember one thing, let it be this. Even with careful calculations, your final number is still an estimate. The potency of your starting flower can vary, and your infusion efficiency might be higher or lower than you think.
When you try your edibles for the first time, take a tiny piece. I’m talking a quarter or even a half of what you think is a 10 mg serving.
And then, you wait.
This is where people get into trouble. Impatience is your enemy. Edibles can take anywhere from 30 minutes to two full hours to kick in. You absolutely must wait at least two hours before even considering taking more. This patient approach is the only way to guarantee a good time and learn the true strength of your homemade creations.
Cooking and Storing Your Creations
You’ve made it through the prep work. Your infused butter or oil is ready, and now the real fun begins: using it. This is where your patience pays off as you turn your favorite dishes into something special. You can get as creative as you want, but there are a couple of golden rules to ensure everything turns out perfectly.
The most important thing to remember? Keep the heat low. THC begins to degrade at temperatures over 350°F (177°C). All your careful work can literally go up in smoke. This doesn’t mean you can’t bake with it, but you have to be smart about your oven settings.
Swapping it into Your Favorite Recipes
The simplest way to start making edibles is to take a recipe you already know and love and just swap in your infused fat. This is perfect for brownies, cookies, or even a simple boxed cake mix.
- Easy 1-to-1 Swap: If the recipe calls for one cup of oil, use one cup of your canna-oil. It’s a straightforward substitution that works nearly every time.
- Dialing in the Strength: Worried your infusion is too potent? No problem. Mix it with regular butter or oil. For a half-strength batch, use half cannabutter and half regular butter. This lets you control the dose without ruining the texture of your final product.
This method works for almost any baked good. Just keep an eye on that temperature. If a recipe calls for baking at 375°F, I suggest dropping it to around 340°F and extending the baking time slightly. A gentle bake is key to preserving those cannabinoids.
Beyond Brownies: Getting Creative in the Kitchen
Look, brownies are a classic for a reason, but don’t let your imagination stop there. Your infused oils and butters open up a world of culinary creations.
- Savory Sauces: Gently warm infused olive oil, toss it with hot pasta, garlic, and fresh herbs for an incredible aglio e olio that’s ready in minutes.
- Finishing Oils: A drizzle of canna-oil over finished soup, roasted vegetables, or even a bowl of popcorn adds a fantastic new layer right before serving.
- Infused Dressings: Whisking your oil into a simple vinaigrette is a perfect no-heat option for salads. For example, combine 1/4 cup infused olive oil, 2 tablespoons of balsamic vinegar, a teaspoon of Dijon mustard, and salt and pepper for a gourmet dressing.
The trick with savory dishes is to add the infused oil at the very end. Avoid hitting it with the direct, high heat of a frying pan to protect both the flavor and the potency.
How to Store Your Edibles for Lasting Freshness
Once you’ve baked your masterpieces, you need to store them properly. Good storage keeps them fresh, potent, and—most importantly—safely away from anyone who shouldn’t be eating them.
Treat your edibles just like their non-infused counterparts. Cookies and brownies are usually fine in an airtight container on the counter for a few days. If you’ve made something with dairy or other perishable ingredients, it definitely needs to go in the fridge.
Crucial Safety Tip: Label everything. I can’t stress this enough. Grab a permanent marker and clearly write “Contains THC – Adults Only” on the container or bag. It is the single most important step you can take to prevent a friend, roommate, or child from accidental consumption.
For long-term storage, both your infused butter and the finished edibles freeze beautifully. I like to wrap things individually before freezing so I can just pull one out at a time. To truly protect your investment, look into the best cannabis storage containers. A good airtight, light-proof container is your best defense against air and light, the two biggest culprits in degrading cannabinoids over time. It ensures that the last edible from your batch is just as potent as the first.
Common Questions About Making Edibles
Even with the basics down, making edibles can throw a few curveballs your way. I’ve heard these questions time and again, so let’s clear the air. Getting these common hurdles sorted out will make you a much more confident cannabis cook.
We’ll cover everything from keeping your kitchen from smelling to understanding why homemade treats can hit so differently.
How Can I Reduce the Cannabis Smell When Cooking?
Let’s be honest: decarbing and infusing cannabis isn’t a low-profile activity. The aroma is most potent during these steps, but you can absolutely keep it under control.
My go-to trick is to decarb your cannabis inside a sealed, oven-safe mason jar. It’s a simple move, but it traps almost all of those tell-tale odors. When it’s time for infusion, using a slow cooker on low with the lid on tight does a great job of containing the smell. Beyond that, good old-fashioned ventilation is your best friend—crack a window and run an exhaust fan.
Pro Tip: To tackle any lingering smells, simmer a small pot of water on the stove with some cinnamon sticks, orange peels, or cloves. It works like a charm to neutralize the air and makes your kitchen smell amazing.
Why Do Edibles Feel Stronger Than Smoking?
This one trips a lot of people up, and it all comes down to how your body processes THC. When you eat cannabis, it passes through your liver, which converts the standard THC into a different molecule: 11-hydroxy-THC.
This new compound is significantly more potent and provides a much longer-lasting, more intense experience than the THC you get from smoking or vaping. It also has to work its way through your digestive system first, which is why it can take anywhere from 30 to 120 minutes to feel the effects. This entire process is exactly why the cardinal rule of edibles is, and always will be, “start low and go slow.“
What Is the Biggest Mistake Beginners Make?
Impatience. Hands down, it’s the most common and dangerous mistake. A beginner will take a dose, wait 45 minutes, feel nothing, and think, “I’ll just have another one.” This is a classic error called “stacking,” and it’s the fastest way to have a miserable time.
Eventually, both doses will kick in, and the combined effect can be incredibly overwhelming. To avoid this, you must give it at least two full hours after your first dose before even considering taking more. Seriously, patience is everything.
Can I Use Stems or Leaves for Edibles?
For the best quality and potency, you really want to stick with the flower (the buds). That’s where the vast majority of cannabinoids reside. You can use “trim”—the small, sugar-coated leaves snipped off the buds—but you’ll need to use a much larger quantity to achieve the same effect.
Definitely steer clear of the large fan leaves and stems. They contain next to no cannabinoids and will only make your butter or oil taste grassy and harsh, ruining the flavor of your final product. The legality of obtaining cannabis can be tricky, so always be sure you know your local laws. If you’re curious about the rules, check out our guide on whether it’s legal to buy edibles online.
Ready to skip the kitchen work and dive straight into premium cannabis products? Elevation Headquarters is your premier dispensary in the heart of New York. From top-quality flower and concentrates to expertly crafted edibles and vapes, we have everything you need to elevate your experience. Visit us online at https://elevationhqnyc.com to explore our selection and enjoy convenient delivery services today